How to build plugins
The IF is designed to be as composable as possible. This means you can develop your own plugins and use them in a pipeline.
To help developers write Typescript plugins to integrate easily into IF, we provide the PluginFactory interface. Here's an overview of the stages you need to follow to integrate your plugin:
- create a Typescript file that implements the
PluginFactoryfromif-core - install the plugin
- initialize and invoke the plugin in your IMP file
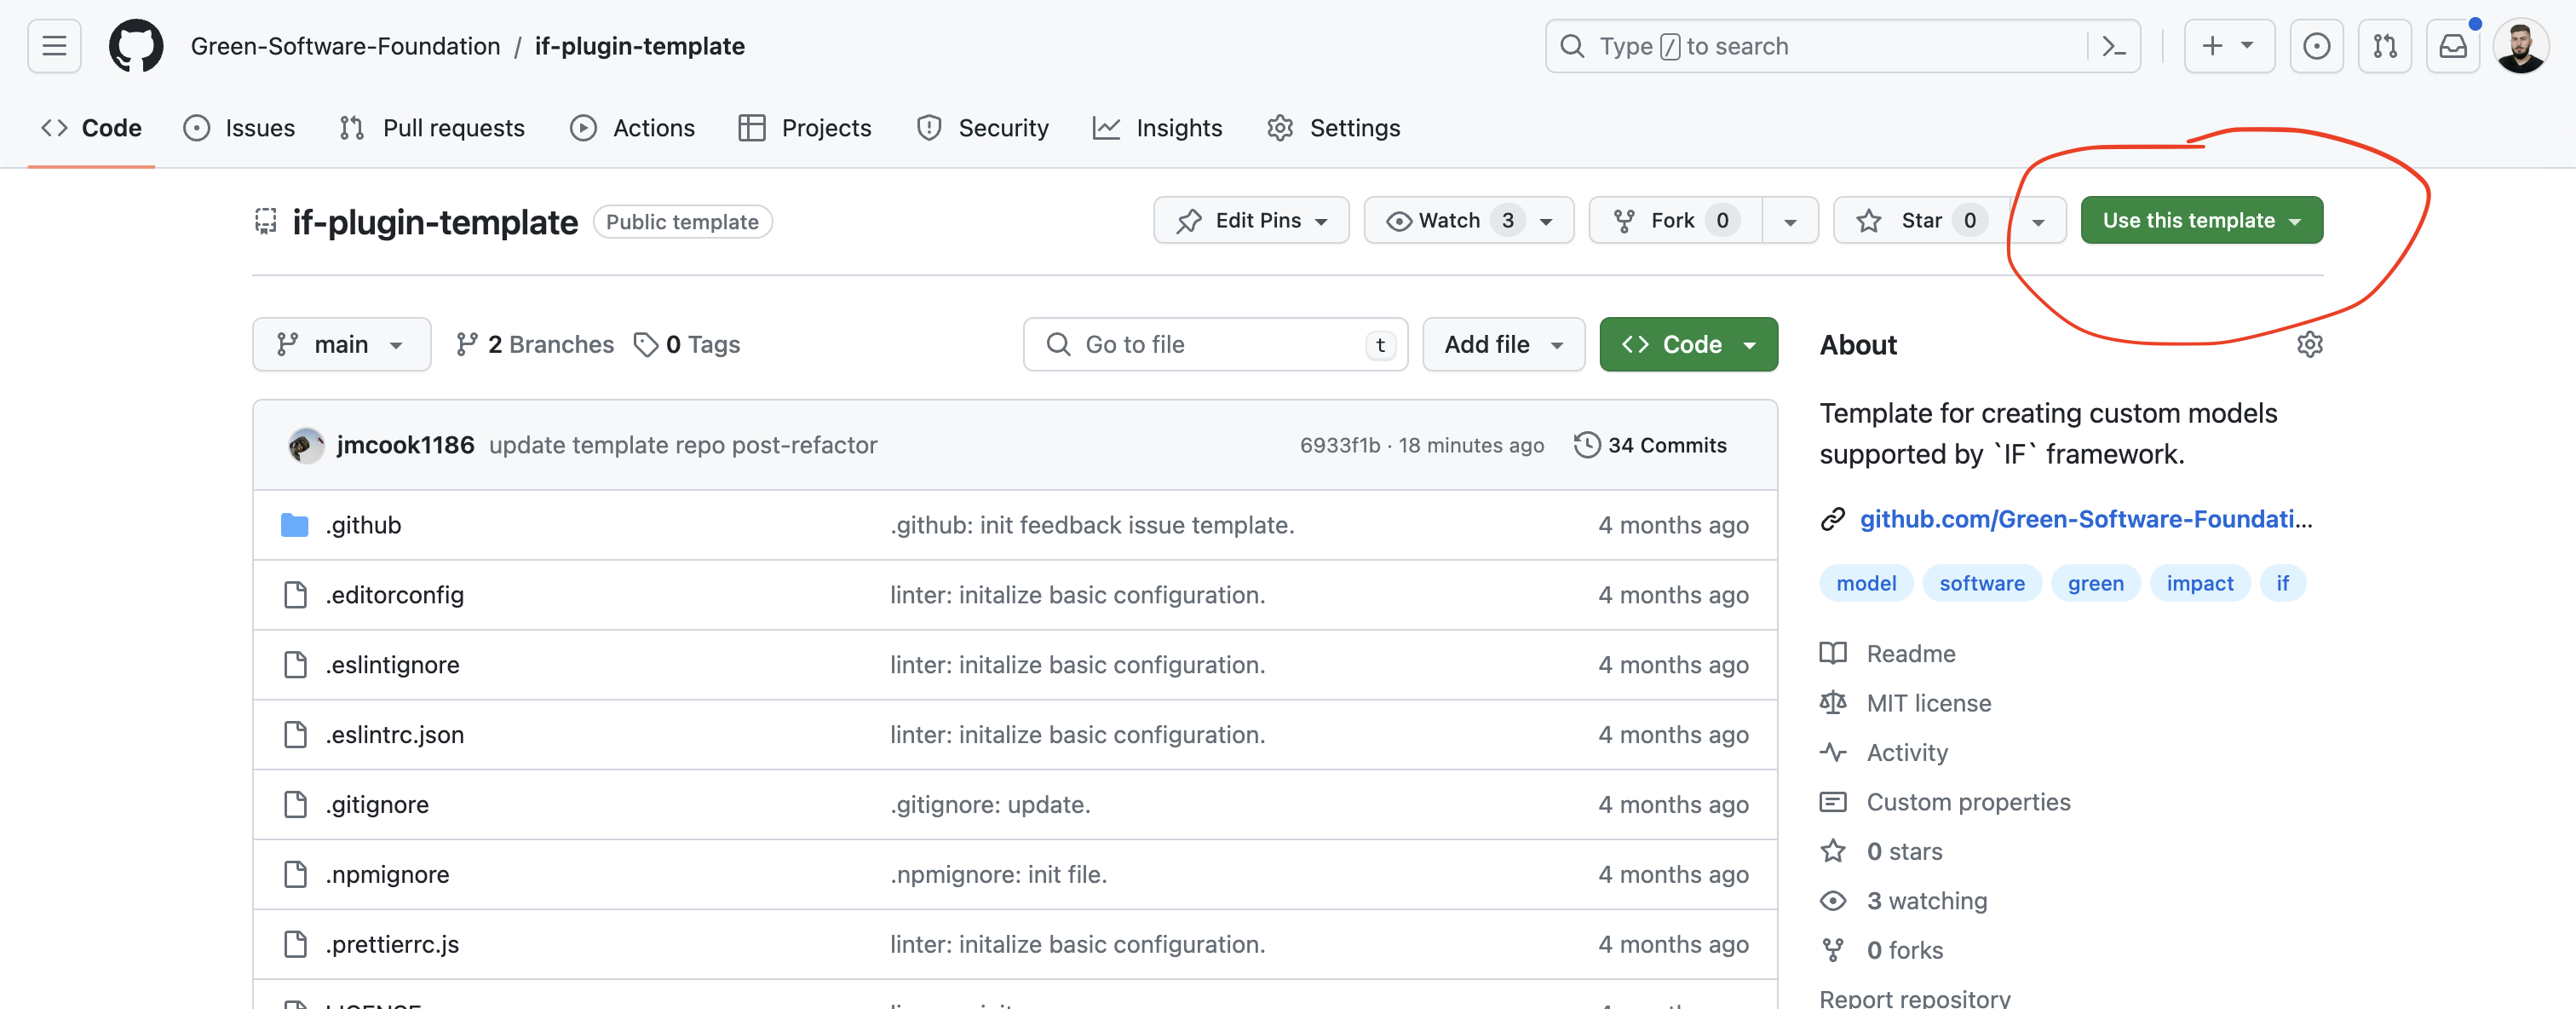
Step 1: Use our template repository
Instead of building up your plugin repository and all the configuration from scratch, you can use our plugin template repository. To use the template, visit the Github repository and click the Use this template button. You will have the option to create a new repository under your own account. Then, you can clone that repository to your local machine.
Inside that repository, all you have to do is run npm install typescript in the template folder, rename the project in package.json and write your plugin code inside index.ts. All the configuration and setup is taken care of for you.
Step 2: Writing your plugin code
Now your project is setup, you can focus on your plugin logic. The entry point for your plugin is index.ts. In this guide it is assumed that all your plugin logic is in index.ts but depending on the copmplexity of your plugin you might want to split the code across multiple files. index.ts should always be your entry point, though.
The following sections describe the rules your plugin code should conform to. We also have an appendix that deep dives a real plugin.
Plugin interface
Your plugin must implement the PluginFactory interface, which is a higher-order function that takes a params object of type PluginFactoryParams. This factory function returns another function (referred to as the "inner function") that manages the plugin’s config, parametersMetadata, and mapping.
The PluginFactory is structured as follows:
export const PluginFactory =
  <C = ConfigParams>(params: PluginFactoryParams<C>) =>
  (
    config: C = {} as C,
    parametersMetadata: PluginParametersMetadata,
    mapping: MappingParams
  ) => ({
    metadata: {
      inputs: {...params.metadata.inputs, ...parametersMetadata?.inputs},
      outputs: parametersMetadata?.outputs || params.metadata.outputs,
    },
    execute: async (inputs: PluginParams[]) => {
      // Generic plugin functionality goes here
      // E.g., mapping, arithmetic operations, validation
      // Process inputs and mapping logic
    });
  });
The inner function returned by the PluginFactory handles the following parameters:
config: An object of typeConfigParams. This parameter holds the configuration settings for the plugin and defaults to an empty object ({}).parametersMetadata: An object of typePluginParametersMetadatathat contains metadata describing the plugin’s parameters.mapping: AMappingParamsobject that outlines how plugin parameters are mapped.
Config
The config object is passed as an argument to your plugin and can be handled as shown in the example above. The structure of the config depends on what is defined in the IMP file. For example, the Sci plugin has access to input-parameters and output-parameter fields in its global configuration, as defined in the Initialize block of the IMP file:
initialize:
  plugins:
    sum:
      method: Sci
      path: 'builtin'
      config:
        input-parameters: ['cpu/energy', 'network/energy']
        output-parameter: 'energy'
Parameter metadata
The parameter-metadata is passed as an argument to the plugin as the config. It contains information about the description, unit and aggregation-method of the parameters of the inputs and outputs that defined in the IMP.
initialize:
  plugins:
    sum:
      method: Sci
      path: 'builtin'
      config:
        input-parameters: ['cpu/energy', 'network/energy']
        output-parameter: 'energy-sum'
      parameter-metadata:
        inputs:
          cpu/energy:
            description: energy consumed by the cpu
            unit: kWh
            aggregation-method:
              time: sum
              component: sum
          network/energy:
            description: energy consumed by data ingress and egress
            unit: kWh
            aggregation-method:
              time: sum
              component: sum
        outputs:
          energy-sum:
            description: sum of energy components
            unit: kWh
            aggregation-method:
              time: sum
              component: sum
Mapping
The mapping is an optional argument passed to the plugin. Its purpose is to rename the arguments expected or returned from the plugin as part of the plugin's execution, avoiding the need to use additional plugins to rename parameters.
For example, your plugin might expect cpu/energy and your input data has the parameter cpu-energy returned from another plugin. Instead of using an additional plugin to rename the parameter and add a new one, you can use mapping to:
a) rename the output from the first plugin so that cpu/energy is returned instead of the default cpu-energy
b) instruct the second plugin to accept cpu-energy instead of the default cpu/energy
The mapping config is an object with key-value pairs, where the key is the 'original' parameter name that the plugin uses, and the value is the 'new' name that you want to use instead.
The mapping block is an optional and allows mapping the input and output parameters of the plugin. The structure of the mapping block is:
Mapping config and output
name: sci
description: successful path
tags:
initialize:
  plugins:
    sci:
      kind: plugin
      method: Sci
      path: 'builtin'
      config:
        functional-unit: if-requests
      mapping:
        sci: if-sci # mapping output parameter
        requests: if-requests # mapping config parameter
tree:
  children:
    child:
      pipeline:
        compute:
          - sci
      inputs:
        - timestamp: 2023-07-06T00:00
          duration: 3600
          energy: 5
          carbon-operational: 5
          carbon-embodied: 0.02
          carbon: 5.02
          if-requests: 100
In the outputs, the sci value returned by the Sci plugin will be named if-sci.
Mapping input
name: embodied-carbon demo
description:
tags:
initialize:
  plugins:
    embodied-carbon:
      method: SciEmbodied
      path: builtin
      mapping:
        hdd: 'hdd-mapped' # mapping input parameter
tree:
  children:
    child:
      pipeline:
        compute:
          - embodied-carbon
      inputs:
        - timestamp: 2023-08-06T00:00
          duration: 3600
          hdd-mapped: 2
Plugin example
Here’s a minimal example of a plugin that sums inputs based on the configuration:
export const Plugin = PluginFactory({
  metadata: {
    inputs: {
      // Define your input parameters here
    },
    outputs: {
      // Define your output parameters here
    },
  },
  configValidation: (config: ConfigParams) => {
    // Implement validation logic for config here
  },
  inputValidation: (input: PluginParams, config: ConfigParams) => {
    // Implement validation logic for inputs here
  },
  implementation: async (inputs: PluginParams[], config: ConfigParams) => {
    // Implement plugin logic here
    // e.g., summing input parameters
  },
  allowArithmeticExpressions: [],
});

const plugin = Plugin(config, parametersMetadata, mapping);
const result = await plugin.execute(inputs);
PluginFactoryParams
The PluginFactory interface requires the mandatory parameters defined in the PluginFactoryParams interface:
export interface PluginFactoryParams<C = ConfigParams> {
  implementation: (
    inputs: PluginParams[],
    config: C,
    mapping?: MappingParams
  ) => Promise<PluginParams[]>;
  metadata?: PluginParametersMetadata;
  configValidation?: z.ZodSchema | ConfigValidatorFunction;
  inputValidation?: z.ZodSchema | InputValidatorFunction;
  allowArithmeticExpressions?: string[];
}
Additional Notes
Implement: You should implementimplementationfunction. It should contains the primary logic to generate outputs.Validation: You should define appropriatezodschemas or validation functions for both config and inputs. This ensures that invalid data is caught early and handled appropriately.Arithmetic Expressions: By including configuration, input, and output parameters of the plugin in theallowArithmeticExpressionsarray, you enable dynamic evaluation of mathematical expressions within parameter values. This eliminates the need for manual pre-calculation and allows basic mathematical operations to be embedded directly within parameter values in IMP files. More details here.Mapping: Ensure your plugin correctly handles the mapping of parameters. This is essential when working with dynamic input and output configurations.
Step 3: Install your plugin
Now your plugin code is written, you can install it to make it available to IF.
npm run build
Then use npm link to create a package that can be installed into IF:
npm link
Step 4: Load your plugin into IF
Now your plugin is ready to run in IF. First install your plugin by navigating to the if project folder and running:
npm link new-plugin
replacing new-plugin with your plugin name as defined in the plugin's package.json. If you are not sure, the name can be checked by running npm ls -g --depth=0 --link=true.
Your plugin is now ready to be run in IF. All that remains is to add your plugin to your IMP file. This means adding it to the initialize block and adding it to the component pipelines where you want your plugin to be executed. For example, an initilize block might look as follows:
initialize:
  plugins:
    new-plugin:
      method: YourFunctionName
      path: 'new-plugin'
      config:
        something: true
Run your IMP uisng
npm run if-run -- --manifest <path-to-imp>
If you have to link more than one local plugin, for example to test your plugin in a pipeline, you can do so with
npm link new-plugin --save
This will create an entry like "new-plugin": "file:path/to/your/plugin" in the package.json which links to your local plugin. This way, multiple plugins can be linked at once. Of course, these changes should not be committed, but they can be helpful for local testing.
Step 5: Publishing your plugin
Now you have run your plugin locally and you are happy with how it works, you can make it public by publishing it to a public Github repository. Now all you have to do to use it in an IMP file is npm install it and pass the path to the Github repository in the plugin initialize block.
For example, for a plugin saved in github.com/my-repo/new-plugin you can do the following:
npm install https://github.com/my-repo/new-plugin
Then, in your IMP file, provide the path in the plugin instantiation. You also need to specify which function the plugin instantiates. Let's say you are using the Sci plugin from the example above:
name: plugin-demo
description: loads plugin
tags:
initialize:
  plugins:
    new-plugin:
      method: FunctionName
      path: https://github.com/my-repo/new-plugin
tree:
  children:
    child:
      inputs:
Now, when you run the IMP file, it will load the plugin automatically.
You can run this using the globally installed IF as follows:
if-run --manifest <path-to-my-imp>
Summary of steps
- Copy our template repository and update
package.json - Add your plugin code to
index.ts - Build and link the plugin using
npm run build && npm link - Load your plugin into
ifusingnpm link - Initialize your plugin and add it to a pipeline in your IMP file.
- Publish your plugin to Github
You should also create unit tests for your plugin to demonstrate correct execution and handling of corner cases.
Next steps
You can read our more advanced guide on how to refine your plugins.
Appendix: Walk-through of the Sum plugin
To demonstrate how to build a plugin that conforms to the PluginFactory, let's examine the Sum plugin.
The sum plugin implements the following logic:
- sum whatever is provided in the
input-parametersfield fromconfig. - append the result to each element in the output array with the name provided as
output-parameterinconfig.
Let's look at how you would implement this from scratch:
The plugin must be a function conforming to PluginFactory.
export const Sum = PluginFactory({
  configValidation: z.object({
    'input-parameters': z.array(z.string()),
    'output-parameter': z.string().min(1),
  }),
  inputValidation: (input: PluginParams, config: ConfigParams) => {
    return validate(validationSchema, inputData);
  },
  implementation: async (inputs: PluginParams[], config: ConfigParams) => {},
  allowArithmeticExpressions: [],
});
Your plugin now has the basic structure required for IF integration. Your next task is to add code to the body of implementation to enable the actual plugin logic to be implemented.
The implementation function should grab the input-parameters (the values to sum) from config. It should then iterate over the inputs array, get the values for each of the input-parameters and append them to the inputs array, using the name from the output-parameter value in config. Here's what this can look like, with the actual calculation pushed to a separate function, calculateSum.
{
  implementation: async (inputs: PluginParams[], config: ConfigParams) => {
    const {
      'input-parameters': inputParameters,
      'output-parameter': outputParameter,
    } = config;

    return inputs.map((input) => {
      const calculatedResult = calculateSum(input, inputParameters);

      return {
        ...input,
        [outputParameter]: calculatedResult,
      };
    });
  };
}
Now we just need to define what happens in calculateSum - this can be a simple reduce:
/**
 * Calculates the sum of the energy components.
 */
const calculateSum = (input: PluginParams, inputParameters: string[]) =>
  inputParameters.reduce(
    (accumulator, metricToSum) => accumulator + input[metricToSum],
    0
  );
Note that this example did not include any validation or error handling - you will likely want to add some for a real plugin.
Managing errors
The IF framework provides its own set of error classes, making your task as a plugin builder much simpler! These are available to you in the if-core package that comes bundled with IF. You can import the appropriate error classes and add custom messages.
The If Core repository contains the PluginFactory interface, utility functions, and a set of error classes that can be fully integrated with the IF framework. Detailed information on each error class can be found in the Errors Reference.
Now you are ready to run your plugin using the if-run CLI tool!